
Tonight I had a craving for some crispy crunchy chicken, which seemed like the perfect opportunity to break out my cast iron skillet and conjure up a new dish to share with you.

As always, Cooking 101 is a place for the novice and perhaps reluctant cook to be guided, step by step, through the cooking process. Rather than offer a recipe that you must decode and follow all by yourself, my goal is to accompany you through the cooking process, reducing the mystery and confusion so that even a befuddled beginner can succeed at the art and science of cooking.
So here is my vision for our meal:
Crispy Peppered Chicken Tenderloins
Alfredo Sauce with Noodles
Roasted Carrots with Mushroom and Garlic
Crunchy Apple Slices
Check out this post to gather up the basic supplies and a few simple pantry items.
In addition, for this recipe, you will need:
and one more item for your pantry:
 |
| I bought this at Target a few months ago..I assume they still carry it but one never knows. |
Ready to shop for ingredients? Here is what you will need:
 |
| A large bag of noodles, a box of mushrooms, one head of garlic (this is a box of two heads), a jar of alfredo sauce, a small bag of carrots, and a big frozen package of boneless skinless chicken breast tenderloins. I'm sure you can wrangle up these items at any grocery store but of course, you know I went to Target. Someday they will pay me to write these posts, but for now, it's purely a love connection.
You'll need about 90 minutes to do all the cooking and prep work. Find someone to sit and talk with you as you work, and enjoy a tasty beverage, and I promise the time will fly by.
1. Preheat your oven to about 450 degrees Fahrenheit, throw some chicken into your large handy dandy cast iron skillet, and toss it into the oven. Our first goal is to cook the chicken through, so set your timer for 10 minutes and prepare for some tending.
That's right...we are throwing frozen chicken directly into the oven, with nary a seasoning or spice, or even a drop of oil. In order to yield a crispy end result, we are going to cook the extra juices out of the meat before we add anything else.
|
 |
| I used about 2/3 of the bag of chicken, as a meal for four people. |
I used all six of the carrots, the entire box of mushrooms, and one of the heads of garlic. I've already carried on about options for slicing mushrooms and you can read about that here.
 |
| I don't bother to peel my carrots. I just wash them clean, trim off the ends and slice 'em up into cute round shapes. |
 |
| When I get to the big fatty end of the carrot, I split it in half the long way, and then continue cutting them into half circles. Remember, our goal is to chop the veggies into similar sizes, so that is my way of adjusting for the thicker bits at the end of the carrot. |
3. The timer just beeped...time to tend the chicken.
The goal is to stir it up, look for signs of progress and set the timer for another 10 minutes.
 |
| This is how the chicken looked after the first 10 minutes..see how the undersides are turning white and the liquid is starting to collect at the bottom of the pan? These are good signs of progress. |
 |
| I flipped all the pieces over and this is how they looked. Definitely needs more time to cook all the way through. |
 |
| Okay, now I have a drippy raw chicken spoon to contend with. On the horizontal surface closest to my oven, I plop down a plate to use as a spoon rest. Keeps all the toxic drips in one easy-to-clean place.
2.b. Back to chopping veggies.
Let's tackle the garlic.
|
 |
| This is one head of garlic. It's a weird clumpy thing held together with a bunch of papery layers. Making this head especially strange are the shoots of green popping out of the top. Fear not. We can handle it. |
 |
| First, just grab the little devil, tear off the green shoots and break it up with your hands. You'll find a dozen or so solid curvy bits attached at the bottom to a hard flat thing. Snap the curvy bits off the flat thing, rip away the papery parts to see what you've got. |
 |
| These curvy parts are called 'cloves' and they are the bits we will eat. |
 |
| One end of the clove is smooth and pointy; the other end is blunt and brown. Cut that end off. |
 |
| Once you cut off the brown bit, the paper wrapping will peel away fairly easily. You can use the tip of your knife to persuade it, if it's a bit stubborn. |
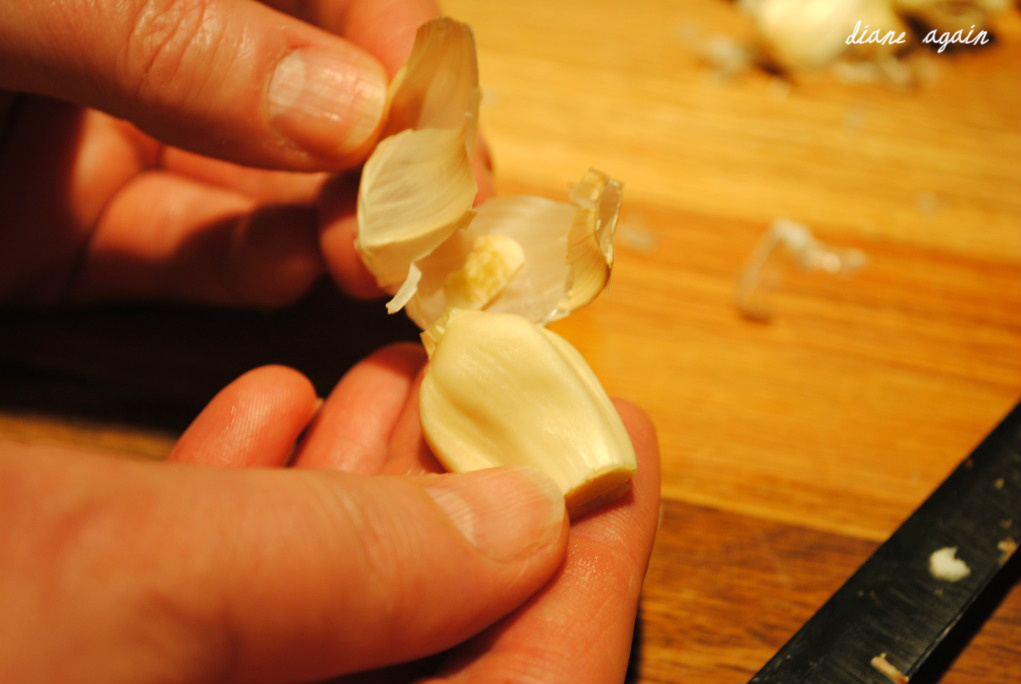 |
| Once you get it started, the whole papery bit should peel away effortlessly. I find this process to be quite enjoyable. It makes your fingers smell weird for about 12 hours but that's just one of the sacrifices we gourmet chefs must make. |
 |
| Harvested cloves, ready and waiting for action. You can throw away everything else.
4. Keep tending the chicken; continue to set the timer for 10 minute intervals and watch for signs that the meat is cooked through.
|
 |
| After the second round of 10 minutes, the chicken is mostly white but still kinda jiggly and pinkish. More cooking time is required. |
 |
| After a total of 30 minutes' cooking time, this looks cooked through. The meat is white and firm; there is quite a bit of liquid in the bottom of the pan. If you have any doubt, you can always cut open one of the thickest pieces and check for any sign of pink.
5. Drain off the liquids, return the chicken to the dry pan, then add 4 or 5 tablespoons of olive oil and plenty of salt and lemon pepper to the chicken.
This is a bit more oil than I typically use, but I'm going for extra crunch and that is what oil will deliver. If you feel squeamish about such a liberal pour of olive oil, just think of a big ol' bucket of KFC and know that the Colonel would roll his eyes and mock us for our minimalist efforts. It's fine.
Return to the oven and set the timer for...you guessed it, 10 minutes.
|
 |
| Here is where the colander comes in handy. I poured off the liquid by myself but that pan is so darn heavy it wouldn't hurt to have an extra pair of hands to hold the colander in place, so you can use two hands on the pan. Also, in the interests of keeping things real, a colander is not mandatory at this point. You could just spoon the chicken out to a temporary holding cell on a plate or such, then pour off the liquid and go from there. But colanders are fun. And I like fun. |
 |
| Back to the pan go my obedient chicken bits. Truth be told, I burned my hand on the hot pan at this stage. It stung for perhaps ten seconds, then I ran it under cold water. I lived. |
 |
| Olive oiled, salted and lemon peppered. Ready for more oven business. |
6. While the chicken starts its first round of cooking in oil, let's get the sauce ready. Umm, pour it into a microwaveable bowl. Done.
I am compelled to add here that making sauces is not hard. Even a very inexperienced chef, with just a bit of encouragement and shoulder patting, can turn out a lovely alfredo sauce. I know you could do it. But here's the thing...we don't HAVE to do it! The kind folks at Bertolli put this perfectly fine sauce together for us, and by leveraging off their efforts, we can simplify our process just a bit and minimize our multitasking madness. I am all for that.
 |
| Sauce in bowl. Good job. |
 |
| When heating things in the microwave, I often use a plate to cover the bowl, keeping heat in and spashes off my microwave walls. Plastic wrap is more work and less green. Off with its head.
7. Shoo Ranger out of the dishwasher.
He loves alfredo sauce-covered spatulas. And I do keep the dishwasher water temperature set at extra hot, to blast away any dog germs that land on my dishes. But still, this behavior is frowned upon. |

8. Chicken check! We are looking for crispy brown yumminess on the chicken and it is coming along nicely. Flip it and set the timer for 10.

9. Put water on for noodles. Use the biggest pot you have and fill it about 2/3 full. Put a lid on it and turn the burner to high.
With rice, you must measure the proper amount of water for the amount of rice you are cooking. But with pasta, water is not an ingredient...it's just a cooking environment for the noodles. And like a good hot tub, you don't want to force polite noodles to intertwine themselves with the other occupants. It's just bad manners and makes everyone uncomfortable. So use a big pot and plenty of water to create a healthy environment for your hot tubbers, and all will go well at your noodle party.
If the water boils before we get to the noodle-adding step, that's fine. Just turn it down to a medium temperature and let it boil merrily while you do other things.
10. After the second round of 10 minutes on my chicken, I decided it was almost but not quite done. I flipped the pieces around a bit and set my timer for 5 more minutes.
This is how the second side looks after a total of 25 minutes cooking in the oil. Mmmm, crispy and golden brown. Perfect.
Move the chicken from the pan to a serving dish, put a lid on it to keep it as warm as possible.

11. Okay, prepare to multitask.
a. Dump all the veggies into the skillet, add 2 more tablespoons of oil and more salt and lemon pepper. Back to the oven it goes with 10 minutes on the timer.

b. Pour the noodles into your boiling water, reduce the heat to medium, stir. Follow the directions on the noodle package; you'll probably need to cook them for about 10 minutes. So when the timer goes off next time, you'll check the veggies and the noodles.

c. Put the covered bowl of alfredo sauce and blast it for 3 minutes or so, till it's nice and warm. Hold it in the microwave, with the chicken, to stay warm.
12. a. After the timer beeps, check the veggies.
Mine are looking soft, and giving up liquid in the bottom of the pan. Good and good. Add the bits of garlic and set for one last interval of 10 minutes.
 |
| The moisture is loosening up all the lovely bits of chicken left behind and that is super yummy news. |
 |
| Garlic burns easily so we saved it till the very end. Some of my cloves were much bigger than others, so I chopped a few of the giants in half, to create more uniform sizes. |
b. At the same time (!!), give the noodles a taste test.
If they are deemed soft enough, use the colander to drain them, then get them in a serving bowl with a bit of butter or oil.
 |
 |
| Stay warm, dear noodles. |
Everyone loves apples, but especially if you have children at your table, they are a sure-fire tummy filler.
 |

Here is my plate..I layered noodles on the bottom, then a big spoonful of alfredo sauce, topped with chicken and then veggies. I ate every single bit and went back for more. I bet yours will be just as delicious!

And to top off the meal, we broke out this year's first box of Girl Scout cookies...these are Tag-a-longs. Enjoy!

Definitely have to try this!
ReplyDeleteEasy and delicious. Let me know how it turns out!
Delete